Building a Hardwood Screen
My house block slopes down as you move towards the back of the block. So by the time we get to the deck the block has sloped away so much that it is the same height as the fence. This means that I don't have a huge amount of privacy on the side of the deck closest to the fence. For a few years now I have meant to get around to putting up a screen of sorts but have lacked the motivation and knowledge to pull it off. After working with a few friends putting up pergolas and decking I decided this year that I would pull my finger out and start work on the deck.
Here is a picture of the deck looking at gap I wanted to work on, but I then decided that if I am going to put a screen up on that side for the sake of consistency I will put up a screen on the opposite side where I have the barbeque.


Each of those gaps was close to 2m in length and I didn't fancy having a single piece of wood that would simply be attached on either end. Instead I planned to have a support piece that would be placed half way between each gap. Starting on the right hand side near the BBQ I had to come up with some way of attaching a 90mmx90mm post to the existing ballustrade. Certainly at the top I had an idea but down the bottom I was simply going to sit it on top of the existing post. Then I had the smart idea of cutting a notch out of the existing post the same as the top and hold them in place with galvanised bolts. But this smart idea only came after the wood had been ordered and delivered. What saved me however was the fact that the minimum size length for a 90mmx90mm post was 1.5meters and I had ordered 1.3metres. The extra 20cm gave me the length I required. Sawing into the existing post was fun. Can't say there was much stability and the cut could have been a lot better, but in the end it didn't come out too badly. Once the post was mounted, holes drilled and the bolts fixed it actually looked pretty good.


So up to this point I had a mate, Adam, helping me out and this 3 day project was looking more like a 3 years. I didn't want to take any more of his time but had to continue never the less. Next on the list of things to do was the attaching of the 90mmx45mm posts. There would be one on either side of each gap and one in the middle for a total of 9 posts to measure, cut, position and fix. This is where quick grip clamps came to the rescue. I originally bought 2, then ended up buying another 3. They were worth their weight in gold.

So within a day I had put up 5 posts on the top deck, with a further 6 posts on the lower.


The following day I added in the middle supports for 2 gaps. This left me with the final support piece that was going to be dyna-bolted to the bricks on the house side and the middle support. As I didn't have a straight line to work with I wasn't completely confident on where the remaining posts were to go. Fortunately one weekend I had my dad, John, drop by to help paint the new posts and give a new lick of paint to the existing. Trying to match the colours was an adventure. I found an old tin of the paint use. Fortunately it had the name of the paint, River Gum. However when I searched for that colour on the paint manufacturers website I could find any mention of it. They did have a contact email address and promptly got back to me saying the colour was still available. So off to Bunnings I went to pick up 4 litres of the stuff. Even then the name wasn't the current name but something else. All very confusing really.


So after we had applied 2 coats of paint I was ready to dyna-bolt the final post to the house, but deciding on the right spot was difficult. With all of the other posts there was a fixed point of reference to work from but I didn't have one in this case. I would have measured and positioned the post 20 times before coming up with a way to ensure I had a completely straight line, bricklayers string. Fixing it to one post and then drawing it out towards the house I was able to get the position of where the final hardwood screening would sit, and simply offset back to the final position of the post. Now came the fun of drilling 3 holes into the brickwork and attaching the dyna-bolts. Well there are a few lessons that came out of this. The first would be to make sure the holes that you drill are perfectly straight otherwise the bolt will be coming out at an angle and you may not be able to slide on the post properly. The second was to ensure the drill was on the impact hammer setting. I was borrowing Adam's drill and didn't really know how to use it properly. But once I found that setting and leaned into it a little bit more I was able to put in the 3 holes with out too much fuss. This now meant the final structural piece to attach was the middle support piece and we were done.

With a final coat of paint, I was now ready to put up the hard wood screen. But before I could do that there was a large amount of wood cutting to be done. Each length for the top part of the deck was around 1.9metres in length, but the wood that was delivered is typically destined for decking which meant that the pieces were of all different sizes ranging from 2.4metres through to 5 metres. This meant that in many cases I had a huge amount of wastage as I wasn't prepared to have half pieces. There was so much wastage in fact that I ended up ordering another 90 linear metres to finish the lower portion of the deck. But anyway, screwing the hardwood was going to be fun. To prevent splitting of the wood when I was screwed it to the support I predrilled all of the holes, then used a countersinking drill bit to give me some depth for the head of the screw to fit in. With softer treated pine the galvanised screws that I was using simply countersunk themselves but with Australian hardwood that is a different story all together. As you can see from the picture below I ended up using 3 drills, 2 cordless and 1 powered. The powered drill was used to do the pre-drill. Other tools that I used were the quick grip clamps and spirit level and 4 pieces of 1.6cm diameter wooden dowel. The wooden dowel allowed me to have a consistent gap across all of the pieces. Each piece of hardwood had 2 screws to affix it to each of the left, middle and right supports.

Here is a shot just over half done. I was pretty happy with how it was turning out and pretty ecstatic once I had a completed panel.


Next was the other final 2 panels on the upper deck. Now the trick with these was ensuring that I had a straight line across. The way I approached this was to first get one of the screens up and then use that as the basis of comparison for the other


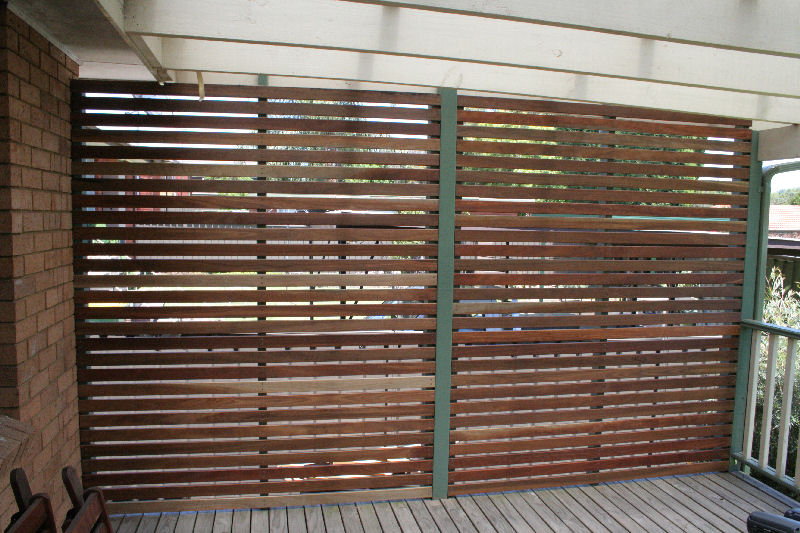
Done!